|
NEW! – Overview of new Photo Capture and GPS Enhancements for CCO
A. Installation Instructions to Upgrade your Handsets
B. Overview and How to Use Photo Capture
C. Overview and How to Use GPS Tracking Support
D. Additional Enhancements
A. Installation Instructions to Upgrade your Handsets
NOTE If you are using a handset that is NOT an i580 from Motorola, DO NOT download this new version. This new version is only for handsets that support photo capture. If you need to switch your units to the Motorola i580, please click on Step 1 above and contact Jack Kollmer for assistance.
First, delete the existing version from each phone. This can be done by:
1. Enter the Main Menu on the phone (button left of the central OK button on most Motorola models).
2. Use the cursor and scroll over to the option that says Java Apps and press OK (cursor is the arrow keys, up, down, left and right).
3. Use the cursor to scroll and highlight Airmobility (you may need to select more to find the program).
4. Click the left button next to the cursor (same button you selected when entering into the main menu above).
5. Scroll down in this menu and highlight Deinstall and select OK. You may be prompted that all programs need to be closed; say Yes. It may list the programs that are being closed and display a green check by each. The Deinstall option under AirMobility will display again and select OK.
6. This will bring up a pop up question asking you if you are sure (may also say something about license not expired). Select Yes. You may also get a warning that deleting AirMobility may destroy other applications (it will not). Say Yes/OK to this as well.
7. The phone will run though a series of steps automatically to delete the application (with green checks). When complete, select Done and then Exit.
The instructions to download and set up the enhanced photo/GPS version remain the same as when your devices were set up originally starting with Step 5 above. The photo version has been uploaded to the Sprint system online and is available for download by following these steps now.
NOTE: If you do not see the program available for download to one of, any of, or all of your handsets, please send an email to michael.lane@sprint.com. Include your city location and the phone numbers of the phones in which do not display the software for download. Once this has been resolved, continue to follow on in Step 5.
In some cases, the new version of AirMobility will need to re-sync itself with the bar code scanner. Use Step 7 for additional information on this if required.
After Step 5 and Step 7 are complete, the software and your phone will be back to a similar state in which you started; ready to use.
B. Overview and How to Use Photo Capture
There are three parts to photo capture; how your field force will use it, how you can view photos online and where the photos will reside migrated automatically back to KB World.
The form in which your field force has been using is virtually the same. Scanning of cards are required, maintenance, etc., However, at the end of the form, the photo portion of the handset is triggered. The worker will simply point the phone to their completed job and take a photo. The photo will now be sent in with the recorded bar code scan and other data collected. For the field worker, the only major change here will be to take a photo. A photo is not technically mandatory by our software as taking a photo may not always be possible, feasible or safe to do so.
Online (here at OutdoorAssets.Net), you may view these photos now on the server by accessing your local account (if you have forgotten your login and password, please contact Alan Gould via email at support@westlakesoftware.com. They are found as links under the real-time status option displayed as:
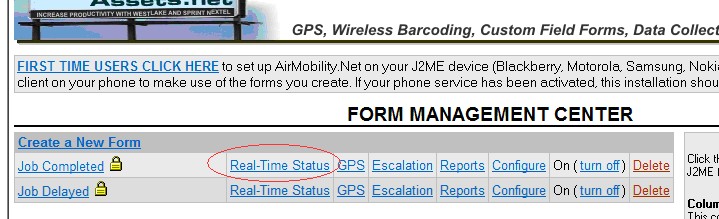
Pick your date and time and select Get Results:

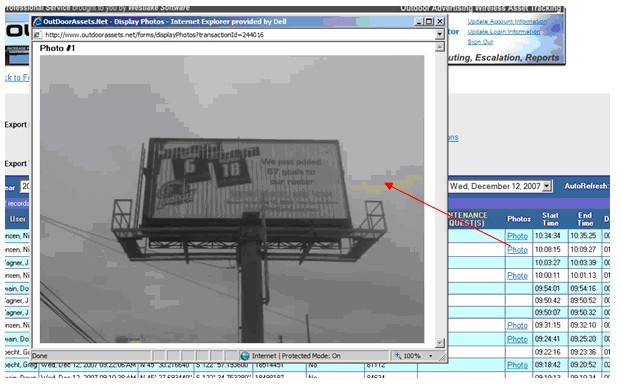
Click on the Photo Link (link is displayed only when a photo has been taken) on the right to display the photo:
Photos are now part of the KB World import process. Photos are returned to KB and can be seen in the Campaign Objects screen. They are attached to the appropriate panels as POST Posting Image type objects [Mike Porter].
C. Overview and How to Use GPS Tracking Support
NOTE 1: For GPS tracking to function properly, the settings on each handset must be in unrestricted mode.
1. Enter the Main Menu.
2. Scroll to option that says GPS and select OK.
3. Scroll to Privacy and select OK.
4. Verify that the PIN Code is four zeros (0000). Then select OK.
5. Scroll and select Unrestricted.
6. Select Back.
If the phone is set to "restricted" or "private," users' coordinates will display the word "Unavailable" in the LAT and LONG section of Real–Time Status:
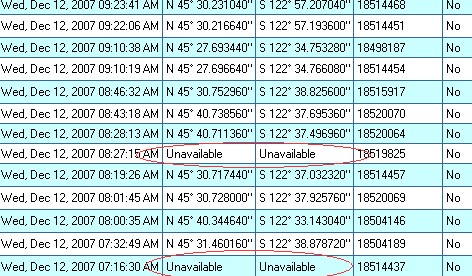
"Unavailable" may also display in the event the unit, at the time of record submission, is unable to obtain a good Satellite fix. You may see this intermittently.
NOTE 2: All GPS devices work best when open to the sky. In your deployment, as most workers are outside doing work, it is our opinion this will work quite well for your needs but it is not a perfect system. Some companies instruct their workers to leave their phones on their dashboard (open to the sky as much as possible) when traveling from location to location.
NOTE 3: GPS tracking starts when the AirMobility program is turned on NOT when the handset it turned on. Once AirMobility has been turned on, turning AirMobility off CONTINUES to track GPS in the background. If you want AirMobility to start up at the time in which the phone starts up, see item 4 in Step 5 above.
NOTE 4: There are times in which the handsets can not get an updated GPS fix. This can be caused by the phone not being open to the sky all day (in the vehicle) or a faltering or broken unit.
NOTE 5: If a worker chooses to do all of their work and then scan and submit all of their work at one time (back at corporate, on a break, etc.), the GPS coordinates will all be the same. In the next section on mapping below, what you will likely see in this case is the path in which they took to do their route but all jobs submitted from the same location at the end. If you want more accuracy and photos to be supported, submitting records after each job is completed with photo support is enforced at the individual office level by management.
NOTE 6: GPS coordinates are captured at one minute intervals when coordinates are available. You may see gaps in bread crumb tracking when not available.
GPS Overview:
There are two places to view GPS functions at www.outdoorassets.net. The first is in Real-Time Status in where the raw GPS data is displayed when a record has been submitted to the server (we do not display all the coordinates we are storing [every one minute] this is used just for mapping purposes today). The second location is under the new GPS feature shown here:

Click on the "GPS" link next to the "Jobs Completed" form to display the GPS tracking controls:

There are several options in viewing GPS data on the mapping server.
1. You may select a date in which you would like to display GPS data (date is always defaulted to the most current date in which we have GPS data available).
2. You can track any individual with a bread crumb trail option. This will display the driving path in which the worker took to each location. NOTE: If a worker has not submitted any records on that day, their name is NOT made available in the drop down of names to select from.
3. You can display the last known coordinates from all workers.
Once you have made your selections, click on Draw Map.
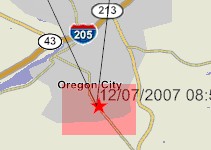
Bread Crumb Trail Example:
When you select a worker in a bread crumb trail, the mapping view will look something like this (taken from a worker in Portland, OR CCO):
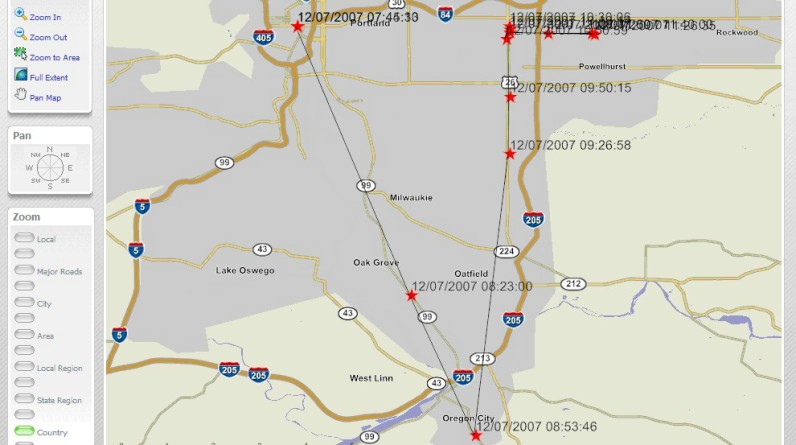
This map currently displays only when he submitted a record. An enhanced version of this will be deployed by Jan 1st, 2008 to show the 1 minute GPS intervals as dots down to the street level.
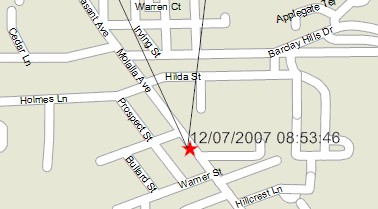
You can experiment with the mapping controls displayed on the left side or use the interactive zoom feature. This is activated by clicking down on your mouse in the upper left of any location and dragging your mouse to the lower right. This will display a red square over the area in which you want to zoom in; down to the street level:
...which will take you to:
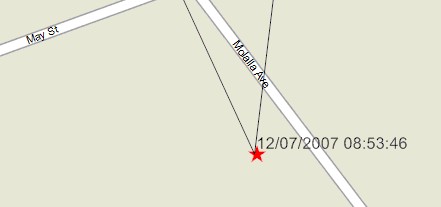
...which can then be taken further to:
In Q1, we will likely be implementing a way to track worker driving speed. In addition, we will be implementing some tools to account for safety (i.e. if the GPS coordinates or activity for any individual stops for more than X hours, generate an alert).
NOTES ON MAPPING: This is largely new technology and requires many setting to be set up correctly on your browser to work correctly. If you are having any trouble displaying maps or if any of the map controls are not working properly, please email support@westlakesoftware.com.
D. Additional Enhancements
The new version on your Motorola phone now supports a true store and forward model. How this works is that instead of each worker submitting a record to our server directly, the record is stored in an outbox. The outbox is now a background operation in which will continue to attempt to submit a record until the device comes back into coverage, the Sprint Network comes back online if they are having a data outage or if Outdoorassets.net is down for any reason. The main value here is that work can now be conducted in and out of coverage more seamlessly and with substantially less issues around data management.
Some offices like Atlanta have substantial issues with coverage on the Sprint iDEN network. This new outbox design will make this seamless for the field force in these areas.
Expect to see additional improvements to the mapping capabilities moving forward with additional features and functions.
|
